AWS EC2のメモリ使用率をCloudWatchエージェントを使用して取得する方法(画面キャプチャ付き)
以前、ハニーポットを運用していたEC2がメモリー増加の影響でハングして、うんともすんともいかなかくなったので、メモリ使用率を監視したいと思い、AWSで実装した方法を備忘のために記載しておきます。
正直公式ドキュメント見れば、わかるじゃんって思ったんですが、公式ドキュメントが結構記載が丁寧じゃないところがあったり、画面キャプチャなどが全くないので、結構はまりました。 AWS自体更新が非常に激しいサービスなので、画面キャプチャを撮ってマニュアル化するのもナンセンスなのかもしれません。この記事も時間が経てば、キャプチャ画面が変わって、いつか役にたたなくなるのかもしれないです。
公式のドキュメントはこちらです。 基本的にはこちらを参考にしながら設定を行い、最終的にはCloudWatchでグラフを見れるようにしました。 docs.aws.amazon.com
IAMロールの作成
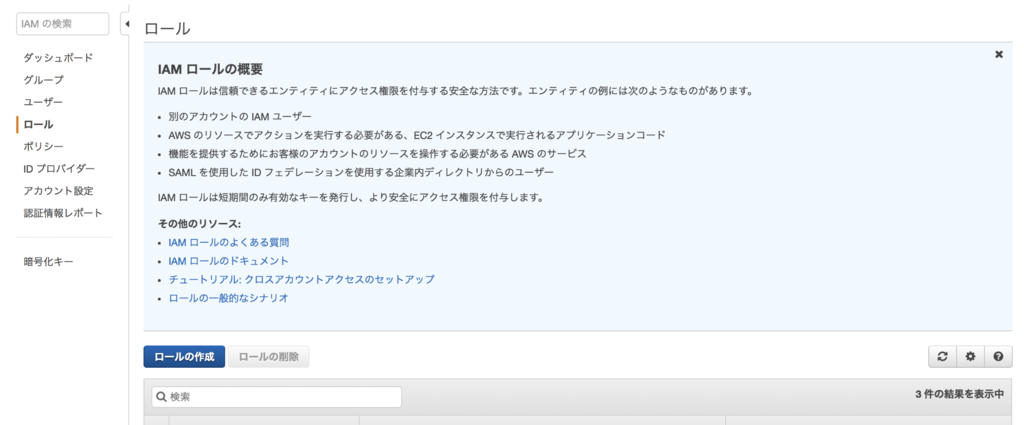
まずはIAMロールを作成します。 IAM画面で「ロールの作成」を押下します。
「EC2」を選択し、「次のステップ:アクセス権限」を押下します。

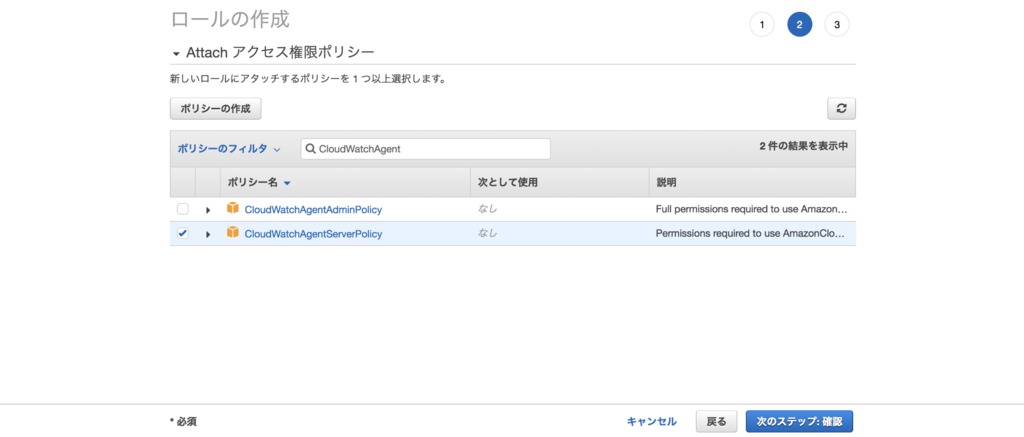
「CloudWatchAgentServerPolicy」をチェックします。 ここで同じ要領で、「AmazonEC2RoleforSSM」を検索し、チェックします。 (僕はこの「AmazonEC2RoleforSSM」のチェックを忘れていて、ハマりました。。。)
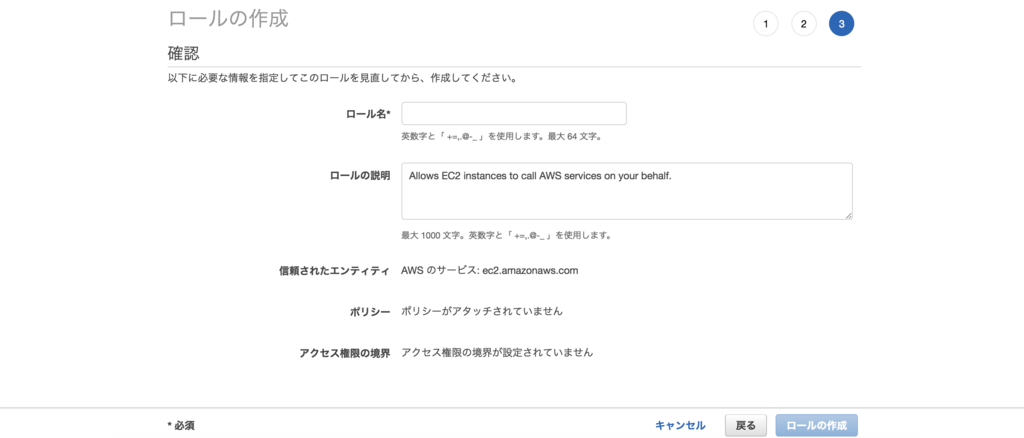
ロールの作成画面では、ロール名に適当な名前を入力し、「ロールの作成」を押下します。
AWS Systems ManagerでCloudWatchエージェントパッケージをインストール
EC2のメモリ情報を取得するためには、CloudWatchエージェントパッケージをインストールする必要があるのですが、楽にインストールするためにAWS Systems Managerを使用します。
まずは、上記で作成したロールを対象のインスタンスにアタッチします。 EC2インスタンスの画面から対象インスタンスを選択し、「アクション」-「インスタンスの設定」-「IAM ロールの割り当て/置換」を押下し、先ほど作成したロール名を選択します。

その次に対象サーバにログインして、AWS Systems Managerを利用するためのSSM Agentをインストールします。 僕のサーバの場合、Ubuntuなので下記コマンドを実行してインストール資材をダウンロードします。 この辺りは、OSのバージョンやアーキテクチャによって変わってくるので、適宜変更してください。
$ wget https://s3.amazonaws.com/ec2-downloads-windows/SSMAgent/latest/
ダウンロードが完了したら、下記コマンドでインストールします。
$ sudo dpkg -i amazon-ssm-agent.deb
Selecting previously unselected package amazon-ssm-agent.
(Reading database ... 73993 files and directories currently installed.)
Preparing to unpack amazon-ssm-agent.deb ...
Preparing for install
stop: Unknown job: amazon-ssm-agent
Unpacking amazon-ssm-agent (2.3.193.0-1) ...
Setting up amazon-ssm-agent (2.3.193.0-1) ...
Starting agent
amazon-ssm-agent start/running, process 6568
Processing triggers for ureadahead (0.100.0-16) ...
これでSSM Agentのインストールが完了しました。
ここまで出来れば、あとはAWS Systems Managerから操作が可能となります。
AWS Systems Managerサービス画面を開きます。 左の「ランコマンド」を押下します。
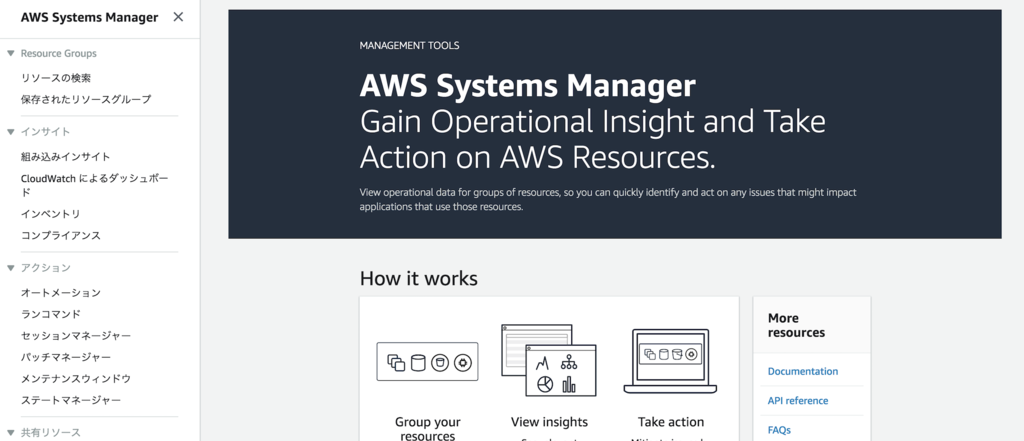
画面右の「コマンドを実行」を押下します。
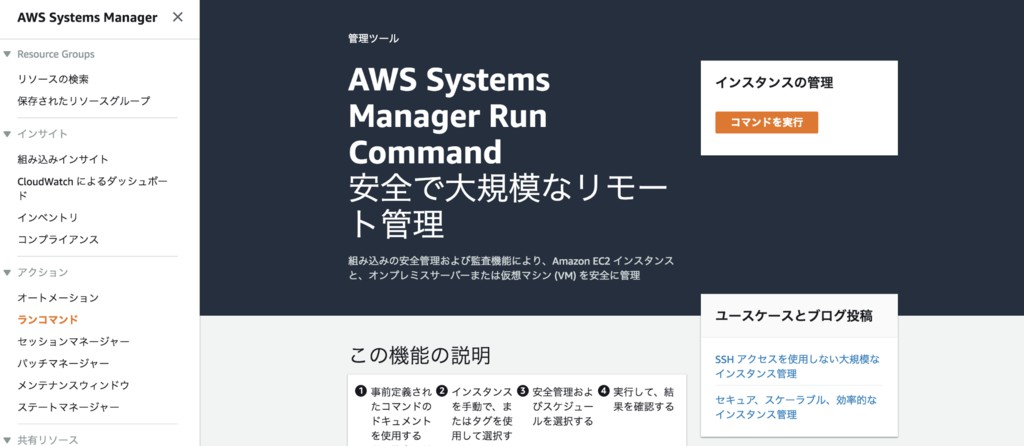
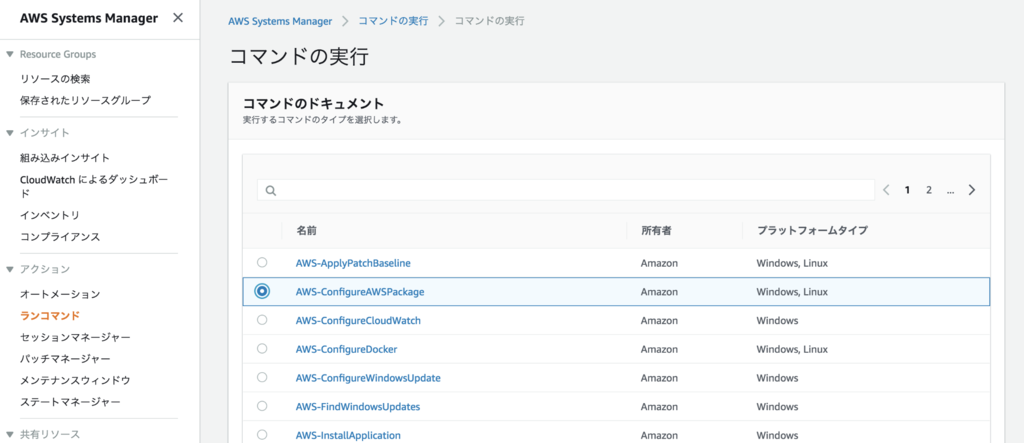
コマンドのドキュメントの部分で、「AWS-ConfigureAWSPackage」を選択します。
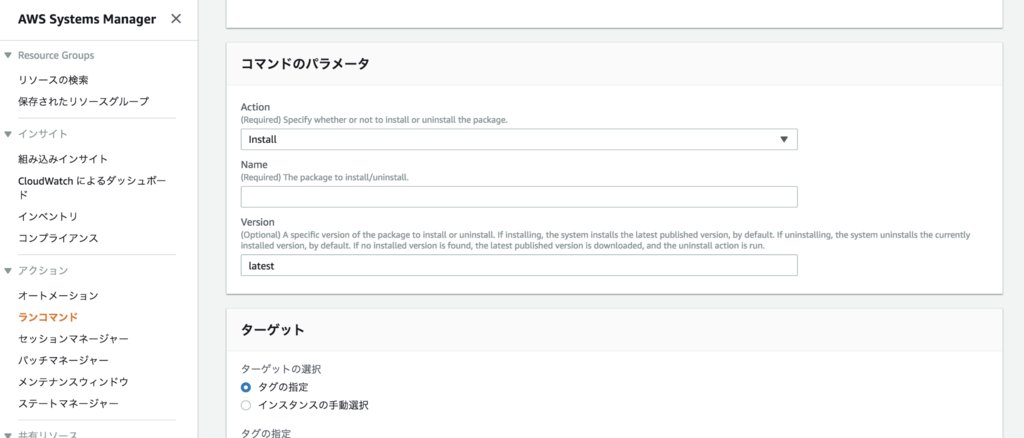
コマンドのパラメータの部分は、Actionに「Install」を選択します。Nameには適当な名前を入力しておきます。
ターゲットの箇所には、上記でロールをアタッチしたインスタンスが表示されているはずなので、そのインスタンスを選択します。
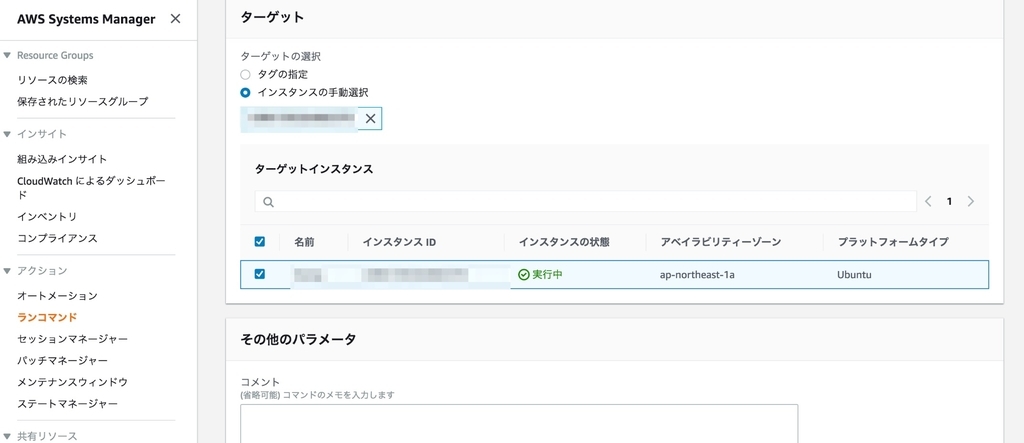
最後に画面下の「実行」ボタンを押下すると、CloudWatchエージェントのインストールが開始されます。 問題なくインストールされれば、コマンドの履歴で「成功」と出力されます。
CloudWatchエージェントのセットアップ
ここまでくればあともう少しです。 対象のサーバにログインして、amazon-cloudwatch-agent-config-wizardコマンドを実行します。
コマンドを実行すると対話型で、いろんな項目の入力を求められるので、適宜要件に合わせながら、変更してください。
$ sudo /opt/aws/amazon-cloudwatch-agent/bin/amazon-cloudwatch-agent-config-wizard
=============================================================
= Welcome to the AWS CloudWatch Agent Configuration Manager =
=============================================================
On which OS are you planning to use the agent?
1. linux
2. windows
default choice: [1]:
1
Trying to fetch the default region based on ec2 metadata...
Are you using EC2 or On-Premises hosts?
1. EC2
2. On-Premises
default choice: [1]:
1
Do you want to turn on StatsD daemon?
1. yes
2. no
default choice: [1]:
1
Which port do you want StatsD daemon to listen to?
default choice: [8125]

What is the collect interval for StatsD daemon?
1. 10s
2. 30s
3. 60s
default choice: [1]:
3
What is the aggregation interval for metrics collected by StatsD daemon?
1. Do not aggregate
2. 10s
3. 30s
4. 60s
default choice: [4]:
4
Do you want to monitor metrics from CollectD?
1. yes
2. no
default choice: [1]:
1
Do you want to monitor any host metrics? e.g. CPU, memory, etc.
1. yes
2. no
default choice: [1]:
1
Do you want to monitor cpu metrics per core? Additional CloudWatch charges may apply.
1. yes
2. no
default choice: [1]:
1
Do you want to add ec2 dimensions (ImageId, InstanceId, InstanceType, AutoScalingGroupName) into all of your metrics if the info is available?
1. yes
2. no
default choice: [1]:
1
Would you like to collect your metrics at high resolution (sub-minute resolution)? This enables sub-minute resolution for all metrics, but you can customize for specific metrics in the output json file.
1. 1s
2. 10s
3. 30s
4. 60s
default choice: [4]:
4
Which default metrics config do you want?
1. Basic
2. Standard
3. Advanced
4. None
default choice: [1]:
1
Current config as follows:
{
    "metrics": {
        "append_dimensions": {
            "AutoScalingGroupName": "${aws:AutoScalingGroupName}",
            "ImageId": "${aws:ImageId}",
            "InstanceId": "${aws:InstanceId}",
            "InstanceType": "${aws:InstanceType}"
        },
        "metrics_collected": {
            "collectd": {
                "metrics_aggregation_interval": 60
            },
            "mem": {
                "measurement": [
                    "mem_used_percent"
                ],
                "metrics_collection_interval": 60
            },
            "statsd": {
                "metrics_aggregation_interval": 60,
                "metrics_collection_interval": 60,
                "service_address": ":8125"
            },
            "swap": {
                "measurement": [
                    "swap_used_percent"
                ],
                "metrics_collection_interval": 60
            }
        }
    }
}
Are you satisfied with the above config? Note: it can be manually customized after the wizard completes to add additional items.
1. yes
2. no
default choice: [1]:
1
Do you have any existing CloudWatch Log Agent (http://docs.aws.amazon.com/AmazonCloudWatch/latest/logs/AgentReference.html) configuration file to import for migration?
1. yes
2. no
default choice: [2]:
2
Do you want to monitor any log files?
1. yes
2. no
default choice: [1]:
2
Saved config file to /opt/aws/amazon-cloudwatch-agent/bin/config.json successfully.
Current config as follows:
{
    "metrics": {
        "append_dimensions": {
            "AutoScalingGroupName": "${aws:AutoScalingGroupName}",
            "ImageId": "${aws:ImageId}",
            "InstanceId": "${aws:InstanceId}",
            "InstanceType": "${aws:InstanceType}"
        },
        "metrics_collected": {
            "collectd": {
                "metrics_aggregation_interval": 60
            },
            "mem": {
                "measurement": [
                    "mem_used_percent"
                ],
                "metrics_collection_interval": 60
            },
            "statsd": {
                "metrics_aggregation_interval": 60,
                "metrics_collection_interval": 60,
                "service_address": ":8125"
            },
            "swap": {
                "measurement": [
                    "swap_used_percent"
                ],
                "metrics_collection_interval": 60
            }
        }
    }
}
Please check the above content of the config.
The config file is also located at /opt/aws/amazon-cloudwatch-agent/bin/config.json.
Edit it manually if needed.
Do you want to store the config in the SSM parameter store?
1. yes
2. no
default choice: [1]:
1
What parameter store name do you want to use to store your config? (Use 'AmazonCloudWatch-' prefix if you use our managed AWS policy)
default choice: [AmazonCloudWatch-linux]

Trying to fetch the default region based on ec2 metadata...
Which region do you want to store the config in the parameter store?
default choice: [ap-northeast-1]

Which AWS credential should be used to send json config to parameter store?
1. ASIAS23XL6BKECR6HP6R(From SDK)
2. Other
default choice: [1]:
2
Please provide credentials to upload the json config file to parameter store.
AWS Access Key:
AWS Secret Key:
Successfully put config to parameter store AmazonCloudWatch-linux.
Program exits now.
一応ちゃんと起動しているか確認する。 エージェントがちゃんと起動しているかは下記コマンドで確認できます。
$ sudo /opt/aws/amazon-cloudwatch-agent/bin/amazon-cloudwatch-agent-ctl -m ec2 -a status
{
  "status": "running",
  "starttime": "2018-11-04T07:12:05+0000",
  "version": "1.204682.0"
}
CloudWatch画面確認
これで設定が完了したので、CloudWatch画面で情報がちゃんと取得できているか確認します。
ちゃんと設定できていれば、「CWAgent」というメトリクスが作成されているはずです。

ちゃんと取得できていれば、下記のようなグラフが表示されるはずです。

ハマったポイント
結構IAMロールあたりで、CloudWatchAgentServerRoleロールが付与されておらず、CloudWatchエージェントを起動しても途中で落ちてしまうという現象に陥りました。
そのときamazon-cloudwatch-agent.logには下記メッセージが出力されていましたので、同じ現象になった方はちゃんとIAMロールがEC2にアタッチされているか確認しましょう。
E! ec2tagger:     : +UnauthorizedOperation: You are not authorized to perform this operation.
        status code: 403, request id: 8795018c-26a2-45e6-804a-955d6ac5f882
まとめ
今回EC2でメモリ使用率を取得するために、下記サービスを利用しました。
- IAM
- AWS Systems Manager
- CloudWatchエージェント
特にAWS Systems Managerなんかは大量サーバを運用しているところでは、かなり活用の余地があるのではないかと可能性を感じました。 コマンドをAWS側で実行してくれるので、オペレーションミスがなく、大量のエージェントに対してリクエストできる点が気に入りました。
今日はここまでとなります。
今度はメモリ閾値を超えたらメールを送信するというところまで挑戦したいと思います。